Delivery Options
This is the documentation for the stable version of the Delivery Options. If you're looking for the documentation for the legacy (5.x) version, please see the delivery options 5.x documentation.
Introduction
This is the MyParcel delivery options module for use in any e-commerce platform's checkout, by [MyParcel] and [SendMyParcel] customers. It's used to show your customers the possible delivery and/or pickup options for their location, based on your settings.
Installation
First, you need to add the delivery options script to your page. You can do this using your favorite package manager or by including the script from the CDN in your HTML.
Option 1: CDN
This is the easiest way. Include Vue 3 and the @myparcel/delivery-options JavaScript and CSS from the CDN in your HTML.
<script src="https://cdn.jsdelivr.net/npm/vue@3.4"></script>
<script src="https://cdn.jsdelivr.net/npm/@myparcel/delivery-options@6/dist/myparcel.lib.js"></script>
<link
  rel="stylesheet"
  href="https://cdn.jsdelivr.net/npm/@myparcel/delivery-options@6/dist/style.css" />
Or, when there is already a different version of Vue on the page, you can use a compiled version of the delivery options that includes Vue. This way you can avoid conflicts between Vue versions.
<script src="https://cdn.jsdelivr.net/npm/@myparcel/delivery-options@6/dist/myparcel.js"></script>
<link
  rel="stylesheet"
  href="https://cdn.jsdelivr.net/npm/@myparcel/delivery-options@6/dist/style.css" />
Continue to usage to see how to initialize the delivery options.
Option 2: Install via package manager
Install the package using your favorite package manager.
npm install @myparcel/delivery-optionsAnd include the script and CSS in your project.
import '@myparcel/delivery-options/dist/myparcel.js';
import '@myparcel/delivery-options/dist/style.css';
Continue to usage to see how to initialize the delivery options.
Usage
If you're using Vue 3, you can use the Vue component. If you're using plain JavaScript, you can use the plain JavaScript version.
Usage option 1: Vue 3
When you're developing in an existing Vue 3 app, you can use the Vue component instead. This is the easiest way to use the delivery options. See the configuration section for all possible options. You can use the smallest possible configuration as an example and/or starting point.
<script setup lang="ts">
import {ref, type Ref} from 'vue';
import {
  MyParcelDeliveryOptions,
  type InputDeliveryOptionsConfiguration,
} from '@myparcel/delivery-options/lib';

const configuration: Ref<InputDeliveryOptionsConfiguration> = ref({
  // Your configuration here
  address: {
    cc: 'NL',
    postalCode: '2132JE',
    number: '31',
    street: 'Antareslaan 31',
    city: 'Hoofddorp',
  },
  strings: {
    // Translations
  },
  config: {
    platform: 'myparcel',
    carrierSettings: {
      postnl: {},
    },
  },
});
</script>

<style>
@import '@myparcel/delivery-options/style.css';
</style>

<template>
  <MyParcelDeliveryOptions :configuration="configuration" />
</template>
Continue to the configuration section to see all possible options.
Usage option 2: Plain JavaScript
Create a wrapper div in your html where you want the delivery options to appear.
<div id="myparcel-delivery-options"></div>
Then, initialize the delivery options with your configuration. See the configuration section for all possible options. For now, we will use the smallest possible configuration as an example.
const configuration = {
  // This is the default selector, you can change it to any CSS selector you want. Make sure it only selects one element.
  selector: '#myparcel-delivery-options',
  address: {
    cc: 'NL',
    postalCode: '2132JE',
    number: '31',
    street: 'Antareslaan 31',
    city: 'Hoofddorp',
  },
  config: {
    platform: 'myparcel',
    carrierSettings: {
      postnl: {},
    },
  },
};

document.dispatchEvent(
  new CustomEvent('myparcel_update_delivery_options', {detail: configuration}),
);
See the configuration section to see all possible options.
To retrieve the selected delivery options, you can listen for the myparcel_updated_delivery_options event.
document.addEventListener('myparcel_updated_delivery_options', (event) => {
  console.log(event.detail);
});
When you change your selection in the rendered delivery options, the event will be fired with the new selection. Example output:
{
  "carrier": "postnl",
  "date": "2024-04-10 00:00:00.000000",
  "deliveryType": "morning",
  "isPickup": false,
  "packageType": "package",
  "shipmentOptions": {
    "signature": true,
    "onlyRecipient": true
  }
}
This can then be used to update the shipping costs in your checkout.
Error events
Whenever the selections in the rendered delivery options output an error, the following event will be fired: Example output:
{
  "exception": {
    "code": 3501,
    "label": "error3501",
    "status": 422,
    "title": "Street cannot be parsed",
    "message": "Street cannot be parsed"
  }
}
To retrieve the error, you can listen for the myparcel_error_delivery_options event.
document.addEventListener('myparcel_error_delivery_options', (event) => {
  console.log(event.detail);
});
Configuration
Almost all settings can be set globally or per carrier. If you set a setting globally, it will be used for all carriers unless you override it for a specific carrier. How you should pass the configuration to the delivery options depends on whether you're using the Vue component or plain JavaScript. See the usage section for more information.
For the most comprehensive information, you can check out our Sandbox. Here you can see (and try) all the possible configuration options and see the result in real-time.
Delivery types
There are four types of delivery options: standard delivery, same day delivery, morning delivery, and evening delivery. You can enable or disable them separately.
{
  "allowDeliveryOptions": true,
  "allowStandardDelivery": false,
  "allowMorningDelivery": true,
  "allowEveningDelivery": true,
  "allowSameDayDelivery": false
}
This configuration will show only morning and evening delivery options.
Cutoff times and drop off days
Drop off days are the days on which you can drop off your parcels at the carrier. This is used to calculate the delivery date. They can be entered in a couple of different ways.
As a string or array of numbers
{
  "cutoffTime": "16:00",
  "sameDayCutoffTime": "9:30",
  "dropOffDays": "1,2,3,4,5",
  // or
  "dropOffDays": "1;2;3",
  // or
  "dropOffDays": [2, 3, 4]
}
In this example, all drop off days will use the cutoffTime and the sameDayCutoffTime from the root of the configuration, so 16:00 and 9:30 respectively.
As an array of objects and/or numbers
{
  "cutoffTime": "15:00",
  "sameDayCutoffTime": "9:30",
  "dropOffDays": [
    1,
    {
      "day": 2,
      "cutoffTime": "16:00",
      "sameDayCutoffTime": "10:00"
    },
    {
      "day": 3
    },
    {
      "day": 5,
      "cutoffTime": "14:00"
    }
  ]
}
In this example the drop-off days are as follows:
| Day | Cutoff time | Same day cutoff time |
|---|---|---|
| Monday | 15:00 (default) | 9:30 (default) |
| Tuesday | 16:00 | 10:00 |
| Wednesday | 15:00 (default) | 9:30 (default) |
| Friday | 14:00 | 9:30 (default) |
Smallest possible configuration
Most keys of the config are optional. The only required keys are:
platform:"myparcel"or"sendmyparcel"carrierSettings: an object with at least one carrier identifier as a key.
The full address is always required.
{
  "address": {
    "cc": "NL",
    "postalCode": "2132JE",
    "number": "31",
    "street": "Antareslaan 31",
    "city": "Hoofddorp" // optional in some cases, but strongly recommended
  },
  "config": {
    "platform": "myparcel",
    // Global settings for all carriers that do not override them go here
    "carrierSettings": {
      "postnl": {
        // Carrier-specific settings for postnl go here
      }
    }
  }
}
All delivery types and options are enabled by default. This has the following result:
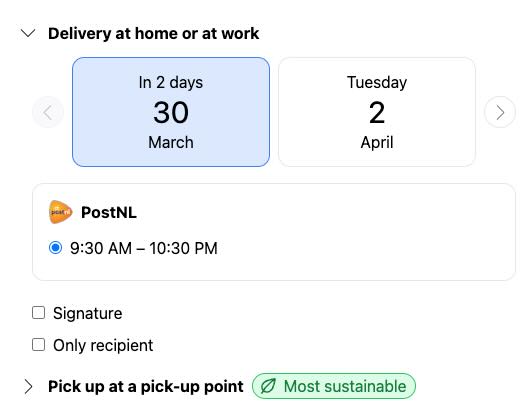
Full configuration reference
These are all the possible configuration options. The strings object is used for translations. The config object is used for all other settings.
{
  // string, CSS selector for the element where the delivery options will be rendered. Optional, defaults to "#myparcel-delivery-options".
  "selector": "#myparcel-delivery-options",
  "address": {
    // string, ISO 3166-1 alpha-2 country code
    "cc": "NL",
    // number | string (spaces are allowed)
    "postalCode": "2132JE",
    // number | string
    "number": "31",
    // string, full address line including number
    "street": "Antareslaan 31",
    // string, required for some carriers. We recommend always passing it.
    "city": "Hoofddorp"
  },
  "config": {
    // REQUIRED. "myparcel" | "sendmyparcel"
    "platform": "myparcel",
    // string, ISO 639-1 language code
    "locale": "",

    // boolean
    "pickupShowDistance": true,
    // boolean
    "showDeliveryDate": true,
    // boolean
    "showPriceSurcharge": true,
    // boolean
    "showPrices": true,

    // boolean
    "allowPickupLocationsViewSelection": true,

    // "list" | "map"
    "pickupLocationsDefaultView": "list",

    // Object containing map tile layer data for OSM.
    "pickupLocationsMapTileLayerData": {},

    // REQUIRED. Object with carrier identifier as keys, containing carrier-specific settings
    // Example:
    // "carrierSettings": {
    //   "postnl": {
    //     "allowDeliveryOptions": true,
    //     "allowStandardDelivery": true,
    // },
    "carrierSettings": {},

    /*
     * NOTE: The following settings can be overridden per carrier. See enum `CarrierSetting`.
     */

    /*
     * Home Delivery
     */

    // Allow any delivery options at all. Required for any of the following settings to have any effect.
    "allowDeliveryOptions": false,

    // Standard delivery. (e.g. 10:00 - 18:00)
    "allowStandardDelivery": false,
    "priceStandardDelivery": 1.0,

    // Morning delivery. (e.g. 08:00 - 12:00)
    "allowMorningDelivery": false,
    "priceMorningDelivery": 1.0,

    // Evening delivery. (e.g. 18:00 - 22:00)
    "allowEveningDelivery": false,
    "priceEveningDelivery": 1.0,

    // Same-day delivery.
    "allowSameDayDelivery": false,
    "priceSameDayDelivery": 1.0,

    // Monday delivery. Requires Sunday as a drop-off day. For myparcel + postnl only.
    "allowMondayDelivery": false,
    "priceMondayDelivery": 1.0,

    // Saturday delivery. Requires Friday as a drop-off day. For sendmyparcel + bpost only.
    "allowSaturdayDelivery": false,
    "priceSaturdayDelivery": 1.0,

    // Allow customer to choose the only recipient shipment option.
    "allowOnlyRecipient": false,
    "priceOnlyRecipient": 1.0,

    // Allow customer to choose the signature shipment option.
    "allowSignature": false,
    "priceSignature": 1.0,

    /*
     * Pickup Locations
     */

    "allowPickupLocations": false,
    "pricePickup": 1.0,

    /*
     * Other settings
     */

    // Cutoff time. Must be a string in the format "HH:mm".
    "cutoffTime": "16:00",

    // Cutoff time when same-day delivery is enabled and possible. Must be a string in the format "HH:mm".
    "cutoffTimeSameDay": "09:30",

    // Number of days in the future to show delivery options for.
    "deliveryDaysWindow": 7,

    // See drop off days section. Can be a string, array of numbers, or array of objects.
    "dropOffDays": [1, {"day": 2, "cutoffTime": "16:00"}],

    // Number of days to delay the drop-off day.
    "dropOffDelay": 0,

    // Package type. "package" | "mailbox" | "digital_stamp" | "package_small".
    // See PackageTypeName enum from @myparcel/constants.
    "packageType": "package", // Default, uses prices from home delivery settings.
    "pricePackageTypeDigitalStamp": 1.0,
    "pricePackageTypeMailbox": 1.0,
    "pricePackageTypePackageSmall": 1.0
  },
  "strings": {} // Translations
}
Upgrading
v5 to v6
The app was rewritten from scratch to be able to upgrade all underlying technologies and to improve the performance and stability. The existing behavior will mostly continue to work, so you can upgrade to v6 without huge changes. However, there are some breaking changes and deprecations, so please read the following list carefully.
New features
- It's now possible to set separate cutoff times per day and per carrier.
- Package type
package_smallis now supported. - You can now pass custom cutoff times per day (and optionally per carrier).
- It's now possible to disable standard delivery but keep showing morning and/or evening delivery.
Other improvements
- A beautiful new design.
- Vastly improved performance and stability.
- The app can now be used as a Vue component in any Vue 3 app.
- TypeScript support.
- Many more exported methods, constants, types and interfaces.
Breaking changes
- It's no longer possible to set
showDeliveryDateper carrier. This is now a global setting only. - The CSS is no longer bundled, so you must manually include
dist/style.css. This does not apply if you're using the Vue component. - The
unselect_delivery_optionsevent has been removed. If you need this feature, please let us know.
Deprecated
cutoffTimeis deprecated, usedropOffDaysinstead- Rather than relying on
allowDeliveryOptionsonly, useallowStandardDeliveryas well.
The existing behavior will continue to work throughout v6 but will be removed/changed in the next major version.
Notable internal changes
- The app is now fully written in TypeScript.
- Upgraded from Vue 2 to Vue 3.
- Upgraded from Vue CLI to Vite.
- Upgraded from Jest to Vitest.